
In this blog, let us see how to add products to the cart programmatically in Magento 2.
This will be useful when
- We need to display/showcase products to users on pages other than the category page, product listing page, and product detail page.
- We want to place a buy now or add to cart button anywhere else on the page (e.g., above header, etc.,) to encourage the buyers to purchase the product instantly.
To do that,
- We need to place the’buy now’ button/ ‘add to cart’ button on the landing page (or wherever)
- Create a module that calls a controller when the button is clicked
- The controller URL holds the id of the product which should be added to the cart
- The particular product will be added to the cart and redirected to the cart page.
Let us see the steps involved in creating such a custom module.
Step 1 : Create the 2 mandatory files:
Refer this blog and create module.xml file inside the etc folder and registration.php file inside Code5fixer/Addtocart folder. Here, Addtocart is the name of the module folder. i.e.,
app/code/Code5fixer/Addtocart/registration.php
Step 2 : Create a Controller file:
As a next step, we shall create a controller file. To do so, create a folder inside the Addtocart folder and name it Controller. Inside the Controller folder, create a folder and name it as Index, and inside the Index folder, create a PHP file and name it as Addtocart.php
The contents of Addtocart.php file will be:
Addtocart.php
                    <?php
                    namespace Code5Fixer\Addtocart\Controller\Index;
                    use Magento\Framework\App\Action\Action;
                    use Magento\Framework\App\Action\Context;
                    use Magento\Framework\Data\Form\FormKey;
                    use Magento\Checkout\Model\Cart;
                    use Magento\Catalog\Model\Product;
                    class Addtocart extends Action
                    {
                        protected $formKey;
                        protected $cart;
                        protected $product;
                        public function __construct(
                            Context $context,
                            FormKey $formKey,
                            Cart $cart,
                            Product $product,
                            \Psr\Log\LoggerInterface $logger

                            )
                            {
                                $this->formKey = $formKey;
                                $this->cart = $cart;
                                $this->product = $product;
                                parent::__construct($context);
                                $this->logger = $logger;

                        }
                        public function execute()
                         {
                            $productId =10;
                            $productId = $this->getRequest()->getParam('id');
                            $this->logger->info("Product Id:" .$productId);
                            $params = array(
                                        'form_key' => $this->formKey->getFormKey(),
                                        'product' => $productId,
                                        'qty' =>1
                                    );
                                    echo("Sucessfully Added");

                    $this->_redirect("checkout/cart", $params);

                            $product = $this->product->load($productId);
                            $this->cart->addProduct($product, $params);
                            $this->cart->save();
                         }
                    }
Here,
- this->getRequest()->getParam(‘id’); is used to receive parameters from the URL
- Product with the id (mentioned in URL) will be added to the cart and redirected to the cart page. The URL now consists of FormKey, productID, and the quantity.
- $this->product->load($productId); is used to load the product information
- $this->cart->addProduct($product, $params); is used to add the product to cart
Step 3 : Create routes.xml file
To make a Controller work, we need a routes.xml file inside the frontend folder of the etc folder.
The contents of this file will be:
routes.xml
<?xml version="1.0"?>
                    <config xmlns:xsi="http://www.w3.org/2001/XMLSchema-instance" xsi:noNamespaceSchemaLocation="urn:magento:framework:App/etc/routes.xsd">
                        <router id="standard">
                            <route frontName="producttocart" id="producttocart">
                                <module name="Code5fixer_Addtocart" />
                            </route>
                        </router>
                    </config>
Remember, producttocart is the frontname and id.
Step 4 : Run all the necessary commands
Now, we need to run commands like setup:upgrade, static-content:deploy, setup:di:compile, reindex, and cache:flush from the Magento root directory.
To know more about more Magento commands, refer this blog.
Let us consider we design the frontend in such a way that the product is displayed on our landing page like this.
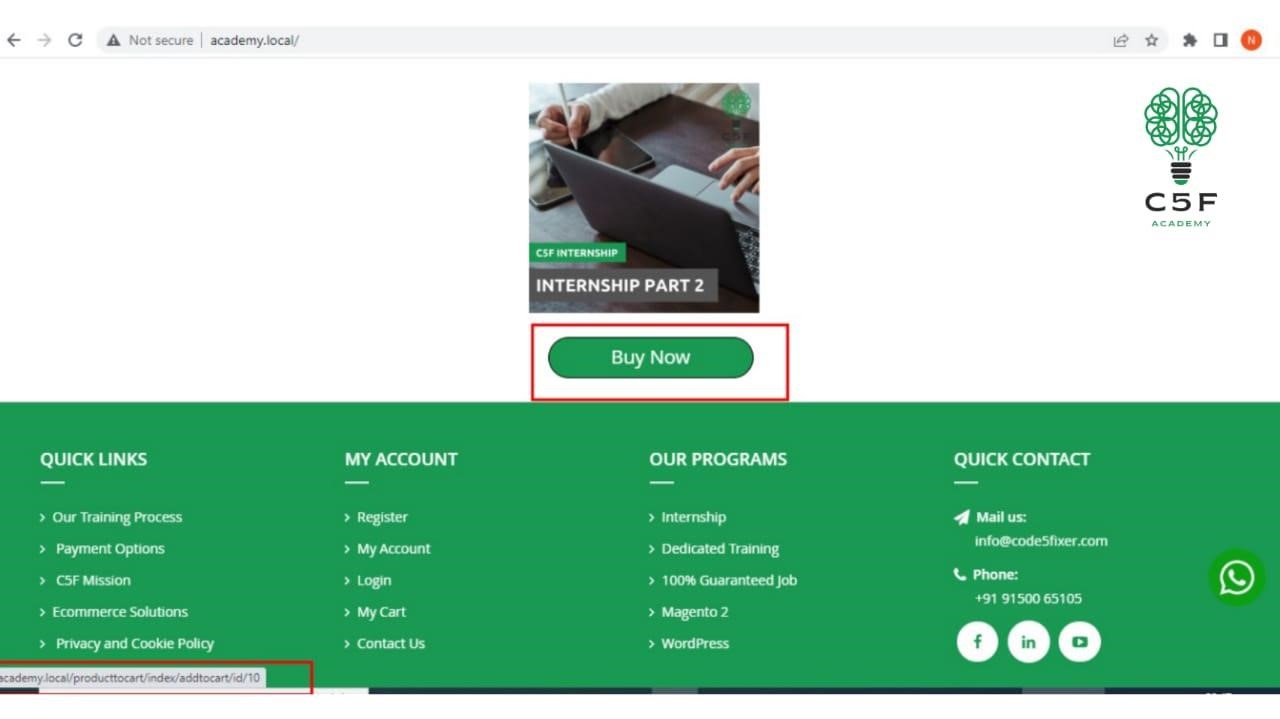
When clicking “Buy now” button, the product with the id 10 will be added to the cart and the cart page will be shown just like below.
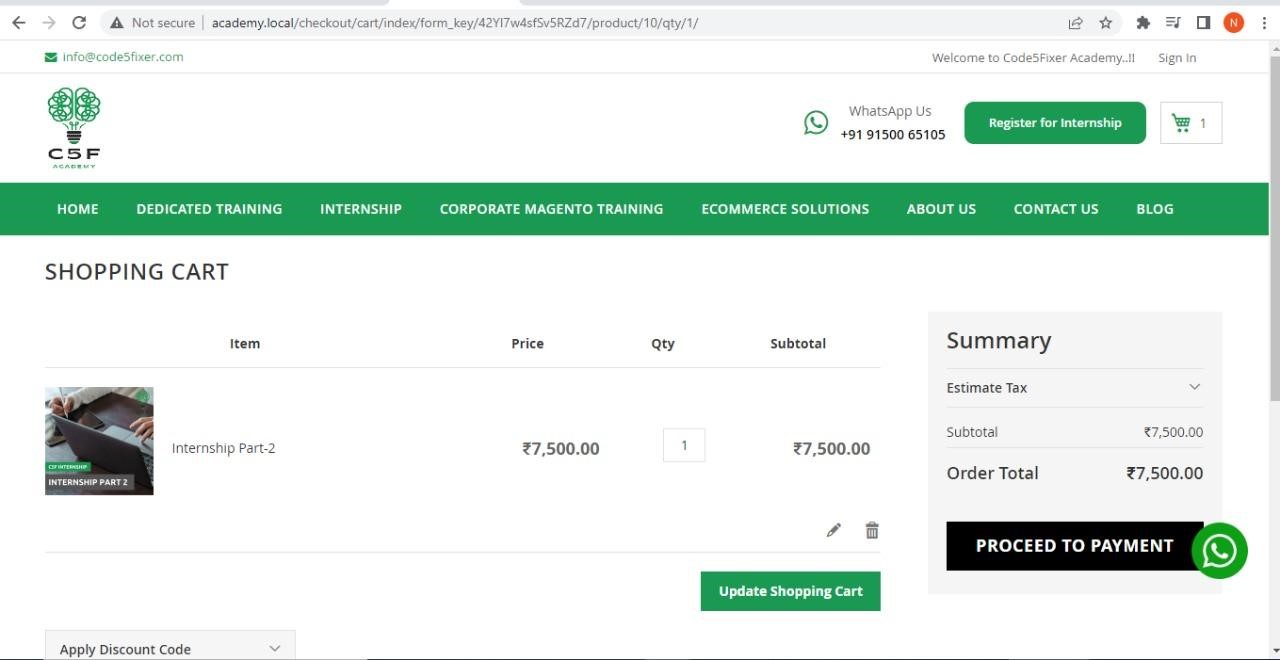
Since the product ‘Internship-Part 2’ is the product with the id 10, it is added to the cart successfully.
We hope, with the help of the above steps, you could add a particular product to the cart when the id of the product is passed as a parameter in the URL. Also, share this blog with your developer friends.
You could also download the above module here
After downloading this module:
- Extract the downloaded zip file
- Paste the extracted Code5fixer folder into /app/code/ folder in your magento root directory.
- Run all the necessary 5 commands and check for output.
You could also refer to this demo video for better understanding.
We hope our guide would be very useful for you. If you have any questions, feel free to reach us anytime by leaving a comment below.
Check out our new blogs here