
Securing your web applications is crucial in today’s digital landscape, and one way to achieve this is by enabling HTTPS with SSL on your local development server, such as WAMP. In this step-by-step guide, we will walk you through the process of setting up and enabling HTTPS with SSL on a WAMP Server virtual host.
Step 1: Install OpenSSL
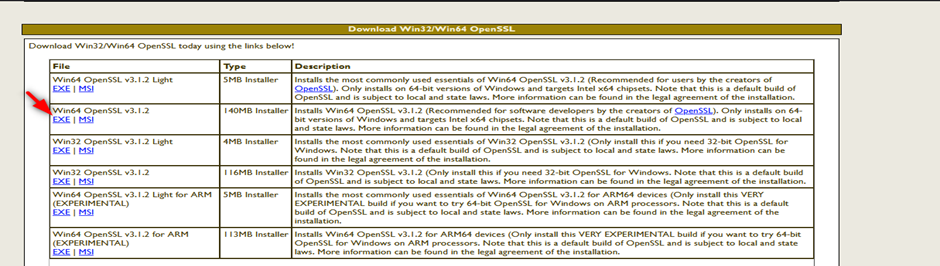
OpenSSL is a powerful open-source tool used to generate SSL certificates and private keys. To get started, download the latest version of OpenSSL, available in both 32-bit and 64-bit versions, from here
After successfully downloading and installing OpenSSL on your machine, let’s proceed to the next step.
Step 2: Create a Private Key
Before we can generate SSL certificates, we need to create a private key. Follow these steps:
- Open your terminal as an Administrator to avoid permission issues.
- Navigate to the directory where OpenSSL is installed using the following command (adjust the path as needed):
cd C:\Program Files\OpenSSL-Win64\bin
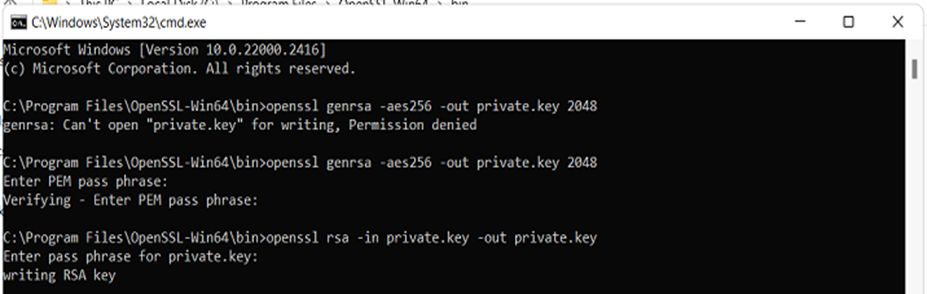
- Generate a private key with 2048 bits encryption by executing the following commands one by one:
openssl genrsa -aes256 -out private.key 2048
- Set a passphrase for your private key (e.g., 12345).
- Verify the passphrase by re-entering it (12345).
- Next, run the following command to remove the passphrase from the private key:
openssl rsa -in private.key -out private.key
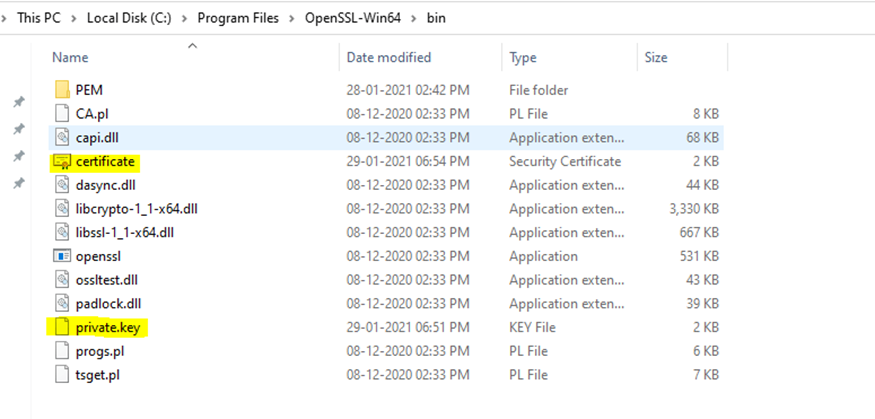
Your private key is now successfully generated and located in the OpenSSL bin directory (C:\Program Files\OpenSSL-Win64\bin).
Step 3: Create an SSL Certificate
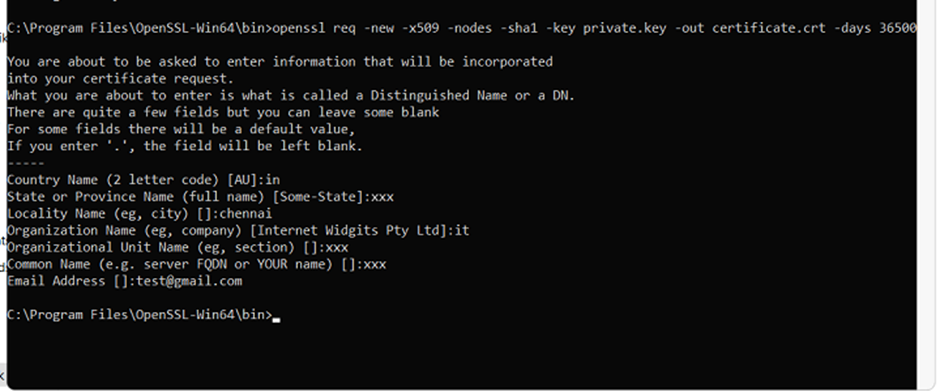
With the private key in place, let’s proceed to create an SSL certificate using the following command:
openssl req -new -x509 -nodes -sha1 -key private.key -out certificate.crt -days 36500
You will be prompted to enter various details for your certificate. Follow the prompts and provide the required information.
You can verify here
Step 4: Move Both Private Key and Certificate
Create a directory named ‘key’ within your WAMP installation directory (e.g., D:\wamp64\bin\apache\apache2.4.46\conf) and move both the ‘private.key’ and ‘certificate.crt’ files to this directory.
Step 5: Configure Your httpd.conf File
Open your httpd.conf file, typically located at D:\wamp64\bin\apache\apache2.4.46\conf, and ensure the following lines are uncommented (remove the ‘#’ symbol):
LoadModule ssl_module modules/mod_ssl.so
Include conf/extra/httpd-ssl.conf
LoadModule socache_shmcb_module modules/mod_socache_shmcb.so
Step 6: Configure Your httpd-ssl.conf File
Open your httpd-ssl.conf file, typically located at D:\wamp64\bin\apache\apache2.4.46\conf\extra\httpd-ssl.conf, and make the following changes:
- DocumentRoot “${INSTALL_DIR}/www”
- ServerName localhost:443
- ServerAdmin admin@example.com
- SSLCertificateKeyFile “${SRVROOT}/conf/key/private.key”
- SSLCertificateFile “${SRVROOT}/conf/key/certificate.crt”
Verify that the following lines are set:
SSLSessionCache “shmcb:${SRVROOT}/logs/ssl_scache(512000)”
CustomLog “${SRVROOT}/logs/ssl_request.log” \
“%t %h %{SSL_PROTOCOL}x %{SSL_CIPHER}x \”%r\” %b”
Step 7: Configure a Virtual Host
- Assuming you’ve already set up a virtual host, open your httpd-vhosts.conf file (located at D:\wamp64\bin\apache\apache2.4.46\conf\extra\httpd-vhosts.conf) and update your virtual host configuration as follows:
- Change the port from :80 to :443.
- Add the following lines inside your VirtualHost configuration:
SSLEngine on
SSLCertificateFile “${SRVROOT}/conf/key/certificate.crt”
SSLCertificateKeyFile “${SRVROOT}/conf/key/private.key”
Your updated VirtualHost configuration should resemble the code below:
<VirtualHost *:443>
ServerName localhost
ServerAlias localhost
DocumentRoot “${INSTALL_DIR}/www”
<Directory “${INSTALL_DIR}/www/”>
Options +Indexes +Includes +FollowSymLinks +MultiViews
AllowOverride All
Require local
</Directory>
SSLEngine on
SSLCertificateFile “${SRVROOT}/conf/key/certificate.crt”
SSLCertificateKeyFile “${SRVROOT}/conf/key/private.key”
</VirtualHost>
Step 8: Restart WAMP Server
You’re now ready to enable HTTPS on your WAMP Server. Restart the server, and if everything is configured correctly, you should see a green WAMP icon indicating success. If the icon is orange, there may be syntax errors in your configuration.
To check for errors, open your terminal, navigate to D:\wamp64\bin\apache\apache2.4.46\bin, and run the following command:
httpd -t
Any syntax errors will be listed for you to address.
Congratulations! Your WAMP Server is now configured to enable HTTPS with SSL on your virtual host, allowing you to develop and test secure web applications locally. Enjoy the added security and peace of mind while working on your projects.